Help Guides
Google Consent Mode v2 with CYTRIO
1. What is Google Consent Mode (GCM) v2?
Consent mode allows web and app developers to adjust tag and app SDK behavior based on user consent choices.
A detailed explanation can also be found at Google’s Consent Mode Overview
The primary change in version 2 of Google Consent Mode is the addition of two new permissions:
- ad personalization
- ad user data
These two permissions are both mapped to the “marketing” cookie category. That means that the CYTRIO script will automatically send the appropriate signals to Google Tag Manager on consent submission.
2. Why should GCM v2 be implemented?
Consent Mode currently supports the following Google services:
- Google Analytics
- Google Ads (Google Ads Conversion Tracking and Remarketing)
- Google Tag Manager
- gtag
- Floodlight
- Conversion linker
3. How to enable Google Consent Mode v2?
With CYTRIO’s consent banner integration to the Google Consent Mode you can respect the privacy choices of end users with minimal impact on your website’s ad-based revenue stream, analytics and more.
Refer to CYTRIO Banner Setup regarding instructions on how to setup the CYTRIO banner on your website using GTM or manually.
Once you have installed CYTRIO consent banner script on your website, you can choose whether to enable/disable GCM functionality by navigating to Administration->Settings and selecting the Support GCM switch.
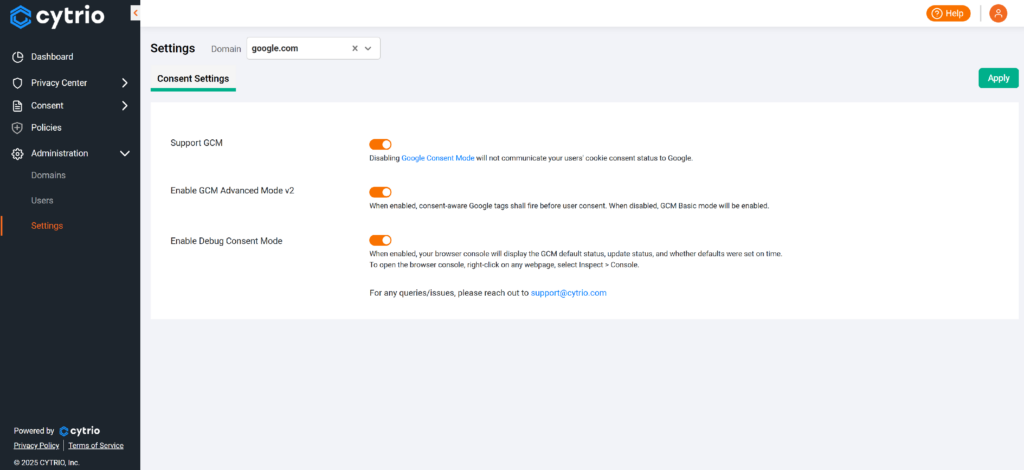
When Support GCM switch is enabled, you will get an option to choose whether to apply Basic or Advanced mode of GCM. Refer GCM Basic vs. Advanced Mode section for more details.
When Support GCM switch is disabled, CYTRIO will not propagate any user consent to Google and no GCM default states will be set.
If the GCM option is enabled, for GDPR banner and US opt-out banner, GCM default states are set by Cytrio script automatically based on the banner geo-targeting set within the admin console, and no additional code needs to be added.
Below is the code snippet that the script uses for setting the GCM default states.
For Global/GDPR banners:
					<script>
window.dataLayer = window.dataLayer || [];
function gtag() {
dataLayer.push(arguments);
}
gtag(“consent”, “default”, {
ad_storage: “granted”,
ad_user_data: “granted”,
ad_personalization: “granted”,
analytics_storage: “granted”,
functionality_storage: “granted”,
personalization_storage: “granted”,
security_storage: “granted”,
wait_for_update: 500,
});
gtag(“set”, “ads_data_redaction”, true);
gtag(“set”, “url_passthrough”, true);
</script>
For California/US opt-out banners:
					<script>
window.dataLayer = window.dataLayer || [];
function gtag() {
dataLayer.push(arguments);
}
gtag("consent", "default", {
ad_storage: "granted",
ad_user_data: "granted",
ad_personalization: "granted",
analytics_storage: "granted",
functionality_storage: "granted",
personalization_storage: "granted",
security_storage: "granted",
wait_for_update: 500,
});
gtag("set", "ads_data_redaction", true);
gtag("set", "url_passthrough", true);
</script>
gtag("set", "ads_data_redaction",false); gtag("set", "url_passthrough",false);
The order in which scripts are loaded is crucial for their proper functionality. Follow the appropriate order based on your consent mode:
For Advanced Consent Mode:
1. Custom Consent Mode script
2. gtag / GTM script (If you are using GTM)
3. CYTRIO banner script
For Basic Consent Mode:
1. Custom Consent Mode script
2. CYTRIO banner script
3. gtag / GTM script (if you are using GTM)
Loading the scripts in this specific order is necessary for their proper functionality.
With the Google Consent Mode and the CYTRIO integration in place, Google services will act according to the signals forwarded by CYTRIO CMP.
Google describes the technical details of how supported tags changes behaviour based on the end user’s consent here: https://support.google.com/analytics/answer/9976101
⚠ Important! CYTRIO script must precede gtag.js or GTM code snippets on your website
Specific tags (such as Google Ads, Analytics, Floodlight and Conversion Linker) have built-in consent checks. This means that these tags include logic that automatically changes the tag’s behavior based on the user’s consent state. No consent configuration is needed for this type of tags.
Tags which do not have built-in consent checks, which do utilize tracking, must be configured with additional consent checks. Opposed to tags with built-in consent checks, which load regardless of consent, tags configured with additional consent checks will not fire unless consent has been given for the corresponding storage category.
4. Default Consent State Mapping
| Google Consent Type | CYTRIO Consent Type | Purpose |
|---|---|---|
| ad_storage | marketing | To enable marketing cookies. |
| analytics_storage | analytics | To enable analytics cookies. |
| functionality_storage | functional | To enable functional cookies for website functionality and settings. |
| personalization_storage | functional | To enable marketing cookies for user personalization. |
| security_storage | necessary | To enable necessary cookies for website security and protection, user UI preferences, etc. Such cookies do not require consent. |
| ad_user_data | marketing | To enable marketing cookies to set consent for sending personal data to Google core platform service. |
| ad_personalization | marketing | To enable marketing cookies to use data for ad personalisation such as remarketing. |
| ads_data_redaction | marketing | To enable marketing cookies to store data regarding Google Ads. |
5. Verify GCM Implementation
Below are the 2 methods to confirm proper implementation of Google Consent Mode on your website:
- 1) Using Tag Assistant
- 2) In-App Debug Mode
Method 1: Using the Tag Assistant
1. Log into your Google Tag Manager account and enable Preview mode from top panel.

2. A Tag Assistant debug console appears at the bottom of your website.
3. Access the debugging window to monitor the tags firing on your site.
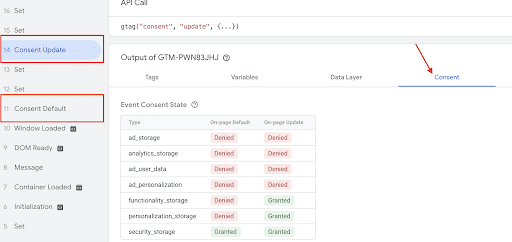
4. Click on Consent Default event on the left and check the default consent states of all the 7 cookie consent types.
5. Once the user accepts/denies cookies on the consent banner on your website, check the Consent Update event in GTM to verify if the consent types show the updated value.
Method 2: Using the In-App Debug Mode
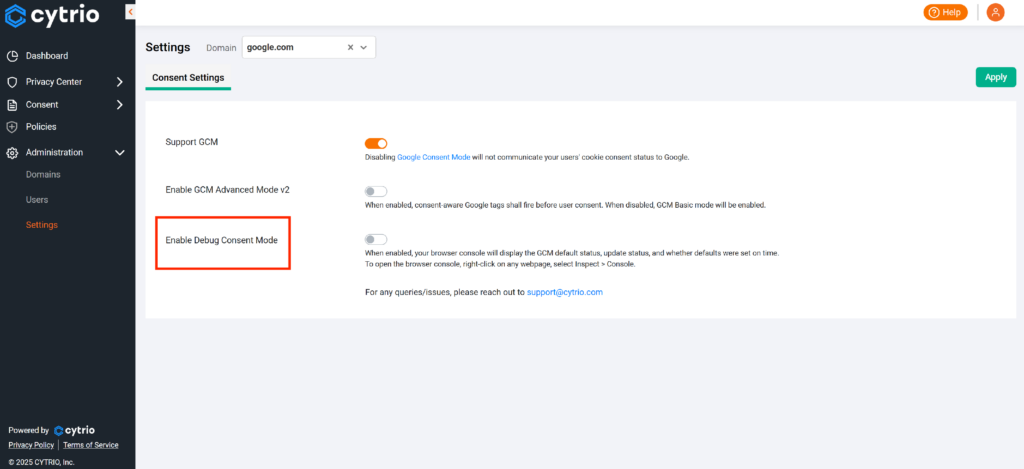
1. Login to your CYTRIO account.
2. Go to Administration > Settings.
3. Turn on the switch for ‘Enable Debug Consent Mode’.

Dedicated Point of Contact for Escalations
For systemic escalations, we have appointed a dedicated point of contact who will respond within the same business day. This ensures that your concerns are addressed without delay, and appropriate actions are taken swiftly.
How to Reach Us
- For General Support: support@cytrio.com
- For GCM Specific Support:
If you encounter any GCM issues that require escalation or need help troubleshooting Consent mode signals on your CYTRIO installation, please send an email to our dedicated google support address: google-support@cytrio.com.
Other modes of contact:
- Phone: +1-508-358-4189
- Forum: Open an issue thread on Github or WordPress forum – https://github.com/Cytrio/CYTRIO-GTM-Template/issues
https://wordpress.org/support/plugin/cytrio-consent-management/
Our team is committed to responding within the same business day, providing you with the necessary support to resolve your concerns.
6. GCM v2 Basic vs Advanced Mode
Google Consent Mode offers two approaches to handle user consent for data collection: Basic and Advanced. Both modes are designed to help businesses gather users’ consent when collecting valuable data for Google Ads and Google Analytics.
Basic Mode offers a more rigorous, conservative approach at the cost of having poorer analytics and conversions. On the other hand, Advanced Mode offers more accurate metrics and insights at the cost of implementing a more flexible approach that still honors user’s privacy and choices but might be riskier in the strictest territories (like Germany).
CYTRIO seamlessly supports both modes, providing websites with the tools necessary to implement Google’s consent management solutions effectively.
How Google Tag Manager (GTM) handles consent
| Feature | Basic Consent Mode | Advanced Consent Mode |
|---|---|---|
| Tag loading | Blocked until user interaction with a consent banner. | Loads with defaults set to denied, unless configured otherwise. |
| Data transmission | No data is sent before a user consents – not even the default consent status. | When consent is denied, consent state and cookieless pings are sent. When consent is granted, cookies are written, and all measurement data is sent. |
| Consent states | Set after user interaction. | Defaults set to denied, unless configured otherwise; updates based on user choice. |
| Tag behavior after user interaction | Loads and executes consent mode APIs only when a user grants consent. | Adjusts tag behavior based on user consent choice. |
| Conversion modeling |
General model (less detailed modeling). This model is less precise because it lacks data from non-consenting users, but it still provides some insights into conversion rates and ad effectiveness. |
Advertiser-specific model (more detailed modeling). |
Using GTM
When installing the consent banner using GTM, the default and update commands are already implemented, thus you only need to ensure that the tags are fired only when a Google Consent Type is granted, regardless of the command used.
- Google Tags (Analytics, Ads, etc): No action needed. They are already configured with built-in consent checks when using GTM.
- Third-party tags: follow our recommended path in our How do I block third-party tags from firing until consent?
How to implement Advanced Mode?
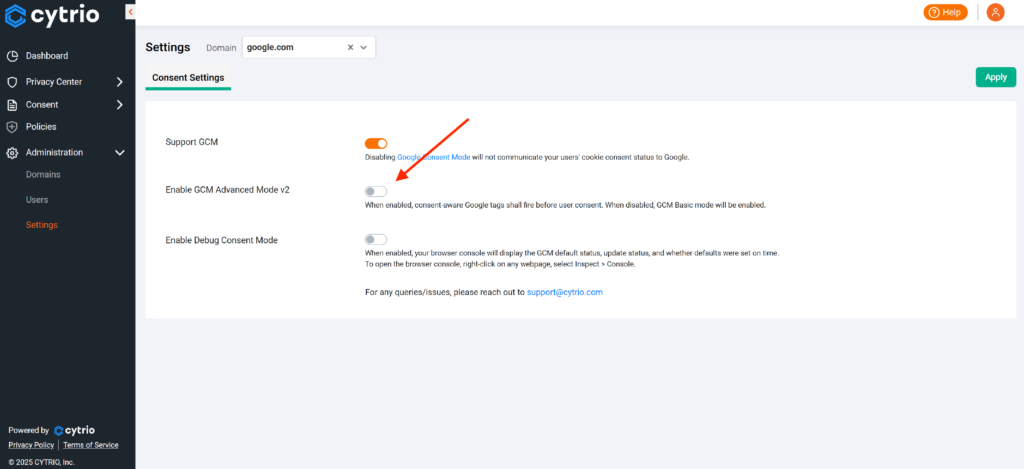
CYTRIO consent banner already comes with Advanced Mode enabled, irrespective of whether you install through GTM or copy the script manually.
7. Block 3rd Party Tags Until Consent
If you use other third-party tags/scripts on your website apart from the consent-aware Google tags, then you can block those from firing until user consent is provided through either of the two methods outlined below:
- Leveraging Google Consent Mode V2 to block other scripts (recommended). To implement this option, you need to install CYTRIO’s GTM consent template.
- Using CYTRIO’s GTM Custom Events. This option is best when you installed CYTRIO without the GTM Tag Template OR when you do not see a direct match between Google Consent Mode V2 Consent Types and the purposes you use your third-party tools.
1. Go to the script tag you want to block in Google Tag Manager.
2. Click on the tag itself and open the Advanced Settings.
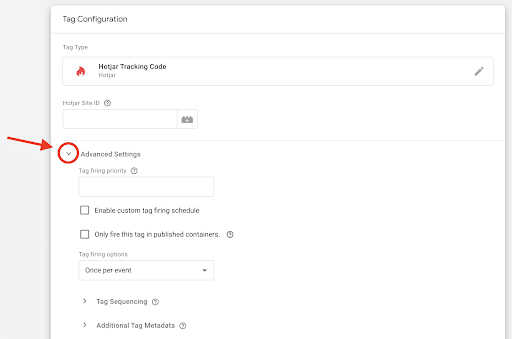

4. Then add the Consent Types you need for your tag.
5. That’s it! Save and publish. CYTRIO integrates automatically with these Consent Types based on your user’s choices.
Using CYTRIO’s GTM Custom Events
1. In Google Tag Manager, go to the Triggers section and click on “New”.


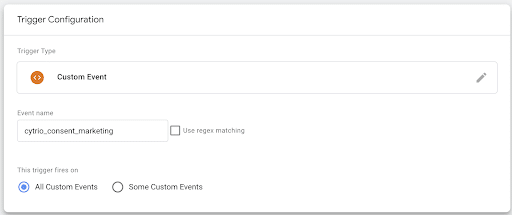
- cytrio_consent_marketing – User provided consent to share data related to marketing category.
- cytrio_consent_analytics – User provided consent to share data related to analytics category.
- cytrio_consent_functional – User provided consent to share data related to functional category.
4. Create a new Custom HTML tag for each third-party script needed using one of the triggers you just set. For example, if you are using a third-party script for Marketing purposes, you should use the Marketing trigger.
5. Hit Submit button to publish your changes.

