Help Guides
Integrations
Setup CYTRIO consent banner with Google Tag Manager
This document provides implementation guidance on deploying the CYTRIO consent management platform using Google Tag Manager.il
To get started with CYTRIO privacy platform, create your account. Configure your site domain within the platform as per the Banner Setup Guide.
Follow these steps to install CYTRIO cookie consent banner on your website through your GTM console:


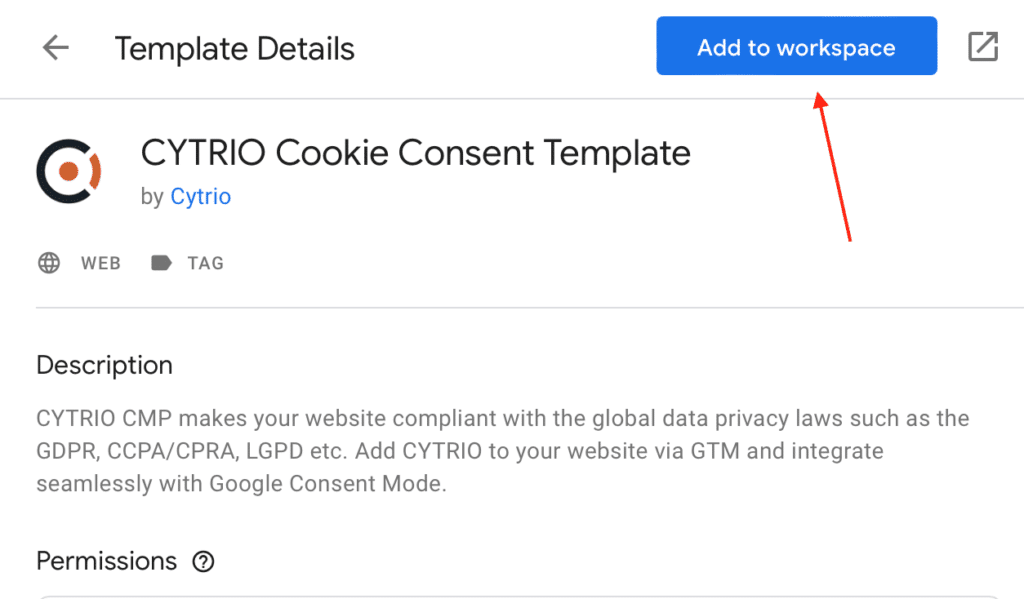

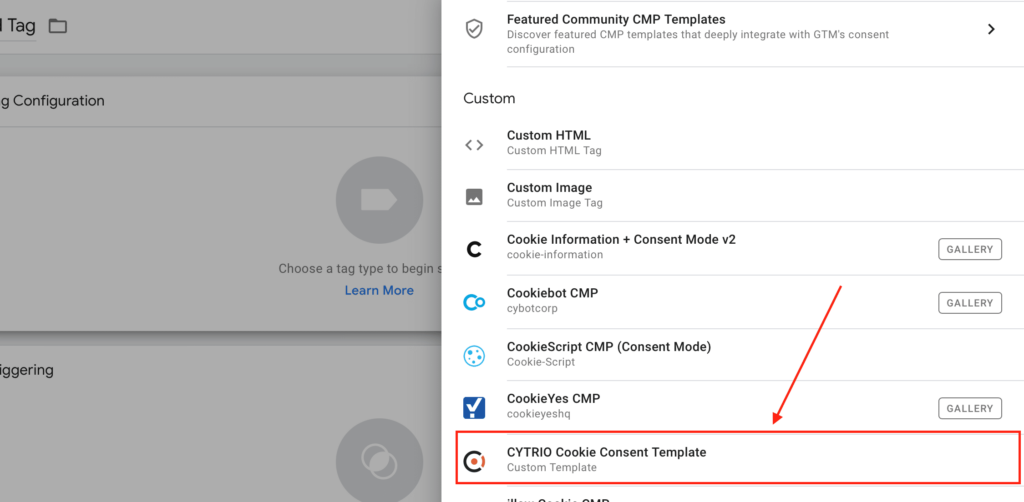
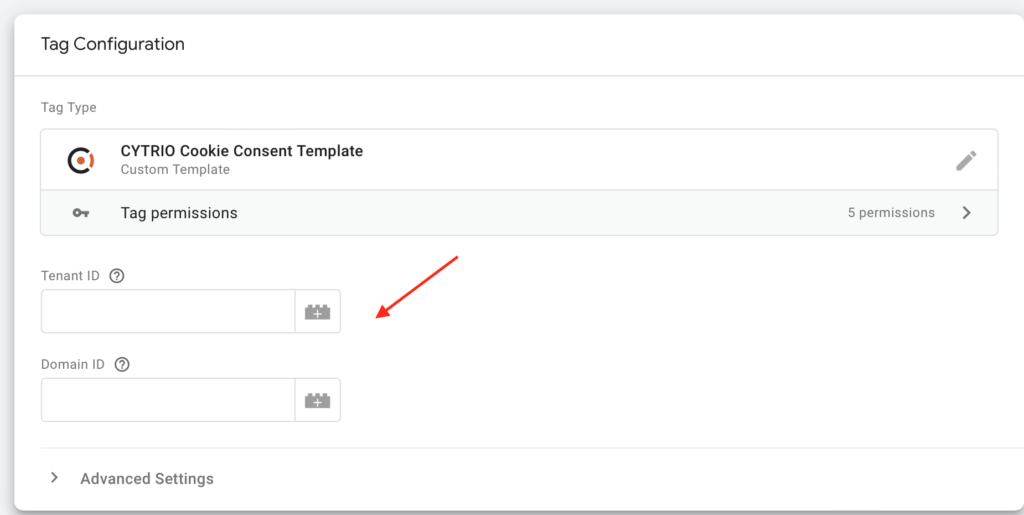

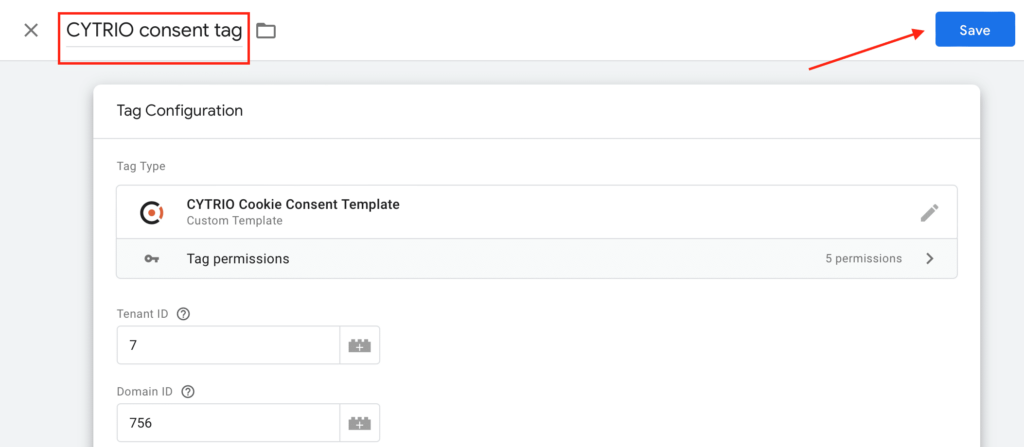

Congratulations! Your cookie banner is now active on your website! Google Consent Mode v2 is enabled by default.
Setup CYTRIO consent banner on WordPress Cloud website
CYTRIO cookie consent banner is compatible and can be installed on your WordPress cloud websites using CYTRIO’s WordPress plugin.
To get started with CYTRIO privacy platform, create your account. Configure your site domain within the platform as per the Banner Setup Guide.
Below is a quick 2-step process to install CYTRIO plugin on your WordPress website:
- Download CYTRIO plugin from WordPress plugin directory – https://wordpress.org/plugins/cytrio-consent-management/.

- Ensure you have your domain configured in CYTRIO admin console. Load the plugin in the ‘/wp-content/plugins/’ folder of your website’s WordPress admin console.
- Activate the CYTRIO plugin by clicking on Activate button in your WordPress admin console.
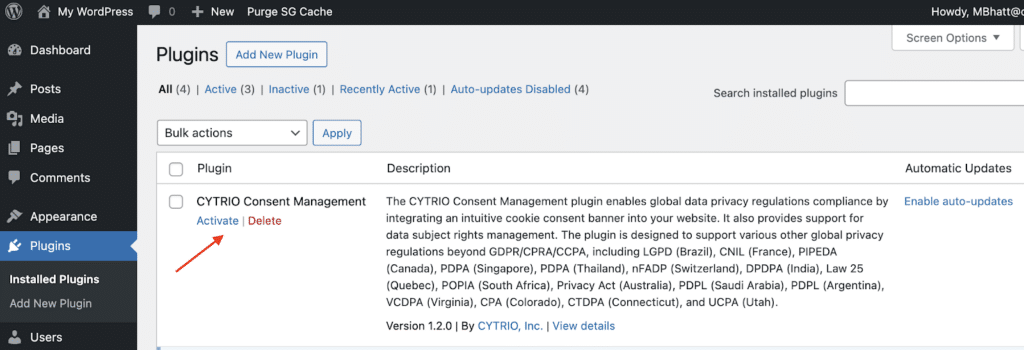
Congratulations! You are now all-set with the CYTRIO consent banner on your WordPress website.
Setup CYTRIO consent banner on Shopify website
CYTRIO cookie consent banner is compatible and can be installed on your Shopify powered websites.
To get started with CYTRIO privacy platform, create your account. Configure your site domain within the platform as per the Banner Setup Guide.
NOTE: If your website is already using Google Tag Manager (GTM), we highly recommend incorporating our banner through our GTM Template. This option streamlines the process, optimizing it for a faster integration without the need for technical knowledge, all with just a few clicks. To integrate with GTM, click here for quick and easy steps.
If you do not have GTM, follow these steps to install CYTRIO cookie consent banner on your Shopify site:
- Log into your Shopify account.
- Under Sales Channels, Navigate to Online Store menu on the left.
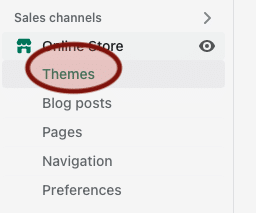
- Within the Online Store, click on Themes.
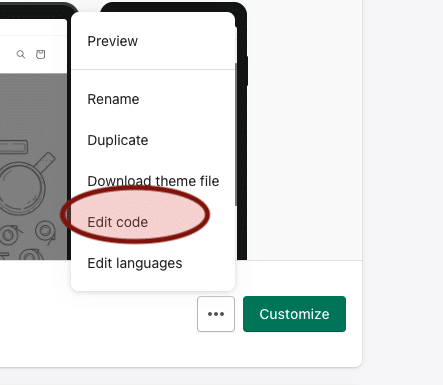
- Click on the “…” button on the right and choose Edit code.
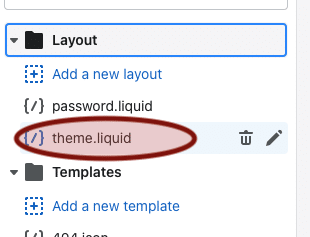
- Under the Layout folder, select Theme.liquid.
- Paste the Cytrio banner script code (this is displayed in the deployment wizard in Cytrio admin console).

- Click on Save. Your CYTRIO consent banner should now be active on your Shopify website.
Setup CYTRIO consent banner on HubSpot website
CYTRIO cookie consent banner is compatible and can be installed on your HubSpot powered websites.
To get started with CYTRIO privacy platform, create your account. Configure your site domain within the platform as per the Banner Setup Guide.
NOTE: If your website is already using Google Tag Manager (GTM), we highly recommend incorporating our banner through our GTM Template. This option streamlines the process, optimizing it for a faster integration without the need for technical knowledge, all with just a few clicks. To integrate with GTM, click here for quick and easy steps.
If you do not have GTM, follow these steps to install CYTRIO cookie consent banner on your HubSpot site:
- First, navigate to the content you wish to install our banner on:
Website Pages: In your HubSpot account, navigate to Marketing > Website > Website Pages.
Landing Pages: In your HubSpot account, navigate to Marketing > Landing Pages.
Blog: In your HubSpot account, navigate to Marketing > Website > Blog.
- Then click on the site and go to Edit. Remove the HubSpot logo from your website page.
- Go to Settings and scroll down to the Advanced Options.

- Finally, click on Publish to save your changes. Your Cytrio consent banner should now be displayed on your HubSpot site.
IMPORTANT: HubSpot will add its own cookies to your website. These are essential for the functioning of your website and cannot be blocked by our banner, so they should be categorized as essential cookies.
Setup CYTRIO consent banner on Drupal website
CYTRIO cookie consent banner is compatible and can be installed on your Drupal 9 powered websites using the ‘Header and Footer Scripts’ extension.
(NOTE: this is only possible for sites that are configured within the CYTRIO platform).
To get started with CYTRIO privacy platform, create your account. Configure your site domain within the platform as per the Banner Setup Guide.
Follow these steps to install CYTRIO cookie consent banner on your Drupal 9 website:
- Install the Drupal 9 extension “Header and footer scripts” – https://www.drupal.org/project/header_and_footer_scripts
- In the CYTRIO admin console, go to the Domains page and copy your CYTRIO banner installation code (<script> tag) from the deployment wizard. (refer Banner Setup Guide to see the steps to configure your domain within the platform and obtain the <script> code).
- In your Drupal9 administration panel – go to “Manage” -> “Configuration” -> “Header Footer Scripts”.
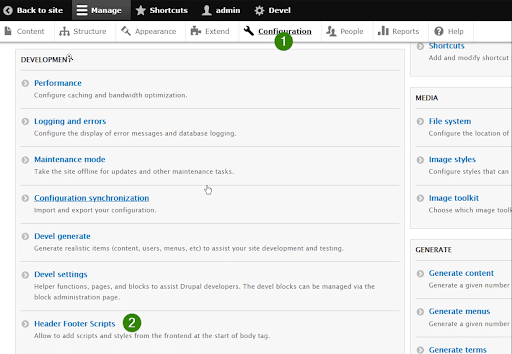
- Under the “Header Scripts” -> “ADD SCRIPTS AND STYLES IN HEADER” section, paste the CYTRIO consent banner script code (copied in step #2) into the “Header Scripts” section. Then click the “Save configuration”.

Setup CYTRIO consent banner on Wix website
CYTRIO cookie consent banner can be installed on the Wix website builder using ‘custom code’ widget (NOTE: this is only possible for sites that are configured within the CYTRIO platform).
To get started with CYTRIO privacy platform, create your account. Configure your site domain within the platform as per the Banner Setup Guide.
- Click here to go to your WIX dashboard.
- Click here to go to your WIX dashboard.
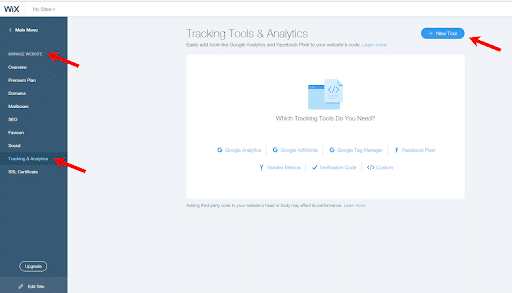
- Go to the Tracking & Analytics section of Site Manager.
- Click + New Tool and select Custom from the drop-down menu.
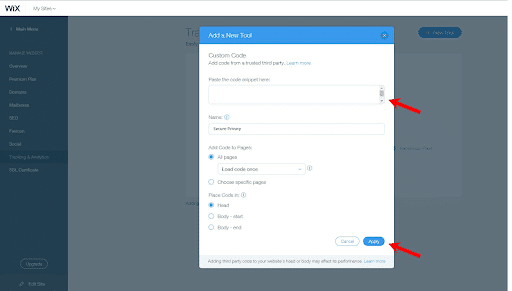
- Paste your CYTRIO banner installation code (<script> tag) into the custom code. (refer Banner Setup Guide to see the steps to configure your domain within the platform and obtain the <script> code)
- Select the relevant domain. Note: This option will appear only if you have multiple domains.
- Enter the name of the custom code (“CYTRIO”, for example).
- Add Code to Pages: Select All pages Load code on each new page to add your code.
- Select the ‘Head’ option in the Place Code section.
Setup CYTRIO consent banner on Joomla website
CYTRIO cookie consent banner is compatible and can be installed on your Joomla-powered website . The installation process includes editing the main page template.
(NOTE: this is only possible for sites that are configured within the CYTRIO platform).
To get started with CYTRIO privacy platform, create your account. Configure your site domain within the platform as per the Banner Setup Guide.
Follow these steps to install CYTRIO cookie consent banner on your Joomla website:
- In the CYTRIO admin console, go to the Domains page and copy your CYTRIO banner installation code (<script> tag) from the deployment wizard. (refer Banner Setup Guide to see the steps to configure your domain within the platform and obtain the <script> code)
- Log in to the Joomla Administration panel.
- Click on the Template Manager link.
- Click the Templates tab.
- Locate the template your site is using, then click on its title.
- Click the Edit main page template link.
- Locate the section and insert your CYTRIO script code (copied in step #1) right below it.
- Click on Save & Close button.
Your CYTRIO cookie consent banner is now installed on your Joomla website!
Setup CYTRIO consent banner on Magento website
CYTRIO cookie consent banner is compatible and can be installed on your Magento e-commerce platform. The installation process includes editing the design/head HTML code.
(NOTE: this is only possible for sites that are configured within the CYTRIO platform).
To get started with CYTRIO privacy platform, create your account. Configure your site domain within the platform as per the Banner Setup Guide.
Follow these steps to install CYTRIO cookie consent banner on your Joomla website:
- In the CYTRIO admin console, go to the Domains page and copy your CYTRIO banner installation code (<script> tag) from the deployment wizard. (refer Banner Setup Guide to see the steps to configure your domain within the platform and obtain the <script> code)
- Log in to the Magento Administration panel.
- From the Admin menu, select System Configuration.
- In the panel on the left, select Design.
- Click to expand the HTML Head section.
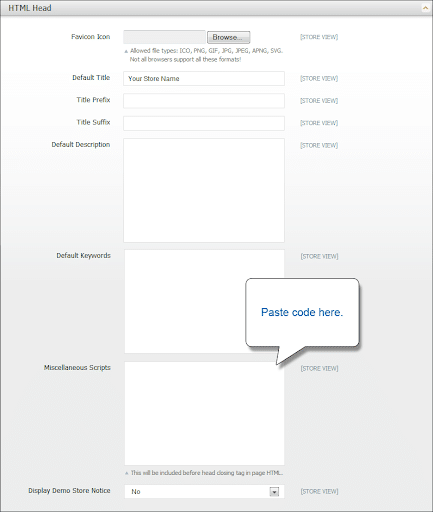
- In the Miscellaneous Scripts text box, paste the CYTRIO script code (copied in step #1).
- Click the Save Config button.

